Because I have a little daughter that seems to get bigger and smarter every day, I try to spend as much time with her as possible.
However, I also know the importance of continuing to learn and develop.
So what I generally do is keep a couple of books near the porcelain throne in order to read them bit by bit and continue to learn without having to miss out on cool stuff with my daughter.
She says, "Uh Oh," every time she breaks a crayon or drops her bottle now, by the way...
We have two different bathrooms at my house, so these are the two things I am reading.
1. Vince Gironda, Legend and Myth - It' taken me a while to get through all of this book, since its 334 pages, but it is a pretty entertaining read.
Gironda seemed to go beyond what everyone else was doing back in his day.
For instance, Gironda instructs AGAINST using milk for protein shakes. He says Milk has too much carbohydrate, that it is incompatible because Protein is an acid medium and Carbs are alkaline.
He also says not use a blender for shakes because the blender emulsifies the fat and it becomes a "suspension too small for digestion." Instead, he suggests mixing protein with heavy cream, using a spoon, and then eating it like pudding.
Sounds freaking crazy, but everybody thought I was crazy for lifting the Two Hand Pinch apparatus the way I do. Now all the people that lift it like me are lifting way more than they used to and the people that say I am crazy are stuck at the same weight while I continue to push the record up.
Whether you think Gironda is bonkers or not, take this into consideration.
Gironda suggests an exercise for upper back development called High Bench Rowing where you lie face-down on a bench and row dumbbells in an abbreviated range of motion.
This sounds amazingly similar to a movement called a Bat Wing, described by the legendary Dan John in a T-nation article I read not too long ago. Dan John is also the author of the other book I am in the process of slowly digesting... (see below)
Look, if you are a person whose sole interest is Strength Training, then Gironda's Book is not for you, BUT if you are focused on muscle building in your training, there are probably some damn good gems in this book for you.
I mean, on page 164, it outlines Gironda's approach and method of Barbell Pressing for delt development. While many articles and guru's out there will tell you that Military Pressing should be done first as the primary way to train delts, he looks at it totally differently and says they should be done as a finisher and in a completely different way from anything I have ever read before.
If you have been thinking about getting this ebook, you should hurry because the Intro Sale is over tonight.
You can go here to get it = > Gironda Book
2. The other book I have recently started is a collaboration from Pavel Tsatsouline and Dan John called, Easy Strength. I have only just started this one, but considering the breadth of information both of these guys have put out, I'd bet this one is going to be awesome.
This one is more of an athletic strength training book and includes topics like training various degrees on 1 Rep Max, the use of Big Core Lifts, Program Design, Plyometrics, Lifting Heavy Weights, etc.
I will bring you more information on this down the road, as I have only had the opportunity to start this one recently.
Until then, have an outstanding weekend and all the best in your training.
Jedd


Sign up for email updates!>>>
Friday, October 14, 2011
What I Read on the John


Thursday, October 13, 2011
Improving the Log Press
I recently posted a couple of video on improving the log press at my main site, DieselCrew.com. You can see the full article here: Strongman Training Log Press Strength.
Included in the post were a couple of videos, which you can see below:
After posting these video clips, I got a few questions, which I answered via my newsletter, but because I have continued to get questions on these videos, I wanted to post them here as well.
Q: Why are you going so light on the band-resisted work?
Actually, the weight in the video is deceiving. The log
we are using is a homemade log built from scrap and
weighed 174-lbs empty. (We left it outside one night and
scrappers came by and stole it from us - bastards).
With the log being so heavy, and with me being so tall,
all that made sense to do at the time was the black
mini-band for the added resistance.
Band-resisted bench press is an exercise that countless
Powerlifters do in order to build strength for the bench
press. Generally, they keep the bar weight light and move
the bar against the bands with as much speed as possible.
This is of course possible with the log as well, if you
have a light enough log. For instance, with a light
enough log, you could attach bands and perform a
more strict version of the press with less leg drive and
put the focus more on the shoulders and triceps.
How we have it set up in that video, it focused on leg
drive and tricep strength, by having to really commit to l
ocking the log out.
The Log Against Bands was HUGE for me as a
competitor. I strongly suggest you try it if you are looking
to increase your Overhead Lifting.
Q: How would you go about adjusting the log
against bands set-up in order to increase or
decrease the resistance?
Good question. In the video, we have the bands attached
near the floor. We modified that squat cage by drilling
holes in its feet and putting in eye-bolts so that we could
easily connect bands.
A good way to be able to adjust the tension of the bands
is to change the location where they are rigged or choked.
For instance, you can choke the bands to the pins of the
squat cage in order to decrease the distance you are
stretching the bands. The higher the pins and the spot
the are rigged, the lighter the resistance will be and vice versa.
I use a slightly different set-up in the video labeled "||||"
on this page: Strongman Training
Q: Where are you training in those videos? It looks
like a garage, but not like your garage?
Yes, that is a garage we are training in, in a couple of
those videos. You see, up until about 2006 I did the
majority of my Strongman Training with about 3 to 5
other dudes in Sayre, PA. Back then we were competing
in Strongman, so we all met at my buddy, Jim "Smitty"
Smith's place to train.
I had a series of injuries late 2005 and 2006 and I decided
to stop competing in Strongman. Around this time, gas
prices started to go through the roof and I began putting
together my own garage gym at the end of 2006, so I
don't get up there much anymore.
(They don't come down here either, LOL)
Those guys also started training full time at a commercial
facility in Elmira NY, which is even further away, so I get
up to train with them even less these days, especially now
that I have a daughter.
Believe me, I miss training with those guys.
We are a group that loves giving it our all, pushing one
another, topping one another, and talking major
SMACK all at the same time.
Q: Is that a mullet in the Log Clean video?
No! That is not a mullet. I never had the balls to carve
a mullet out of it.
From 2005 to 2008 I had some pretty long hair. In fact,
I was traveling on red-eye flights one time and was given
service at an airport shop after hours because the guy
thought I was Triple H...
Triple H basically stole my look, even my chin-strap beard
that grew into a mustache.
Hopefully this Q and A section help you better
understand the reasoning behind what is going on in the
videos. If you have any other questions, let me know and I
will try to cover things in more detail in a future email.
For more information on Strongman Training, check out our DVD, below:

Sunday, June 05, 2011
Strongman DVD Coming Soon
Guys, I am coming out with a DVD on Strongman Training very soon. If you want to get on the early bird list, sign up below:
Put your name and email in the box below.

Monday, May 16, 2011
Isometrics for Gripper Strength
This is another outstanding guest post from Mike Rinderle. Enjoy!
When you hear the term isometrics, many people flash back to the old Charles Atlas Courses in the back of our childhood comic books. But isometric training is making a big comeback for weightlifters, strongmen, and even grip athletes. So how do we apply isometrics (Isos) to your gripper training for huge gains?
An isometric exercise is one where the range of motion during the muscle contraction is very small or non-existent. It allows you to exert maximum force over a very short distance (or statically) for a period of time. This leads to stronger tendons, the ability to fire your CNS more efficiently, and increased time under maximum muscle tension, which will lead to strength gains.
There are 3 main types of Isos used to increase gripper strength: static, short concentric (positive), and short eccentric (negative). Let’s look at how we can apply all three to really jumpstart your gripper performance.
Overcrushes (static): Use a gripper that you can close and hold for at least a few seconds. If it is filed or is a narrow handle gripper that is even better, because it will strengthen you BTR (beyond the range). Close the gripper and squeeze as hard as you possibly can for as long as you can. If you can hold for more than 15 seconds, it is time to move up a gripper level, or file some more off the handle of the one you are using. I would do no more than 2 - 3 of these per hand because they will fry your forearms. Don't fall into the trap of just holding them barely hard enough to keep them closed. Squeeze with everything you've got until the gripper starts to open up, and then you let it open. This is not a negative, and doing a negative as it opens up after a hard overcrush can injure you. Just let it open slowly.
Choker closes (concentric): Get a sturdy hose clamp, tape the tops of the gripper handles and clamp your goal gripper to parallel or inside parallel (whatever width you need to close it). You will do explosive singles on this gripper. Only singles. Your goal is to explode into the close and click the handles as fast as you can. Wait until you recover and do another one just as hard and as fast as the last. Once the closes start to get a bit slow, or you can't touch the handles anymore, you stop. Period. If you can get more than 5 - 7 of these then it is time to open the clamp up slightly wider the next time you do these or use a harder gripper.
Bounce Forced Negatives (BFNs) (eccentric): Use a gripper one level higher than your goal gripper. Use your leg, or off hand to cheat close it and then fight like hell to keep it from opening up. When it gets to parallel, use your other hand (or leg) to force it back shut and fight like crazy to keep it shut again, repeat one more time when it gets to parallel. That's one set of 3. Do no more than 2 sets. These will toast you. Also, this will be a bigger gripper than you are used to and if it has sharp knurling you need to not just let it spring open after the last negative gets to parallel, or you could lose some skin. Let it open slowly.
Use only one of these as a finisher for each grip workout you do. Alternate them for best results. I believe if you add some Iso work into your arsenal of training weapons, you will be amazed at how fast the gains come. Each movement trains the muscles, tendons, and CNS in a slightly different way, but each is very effective. Many people using these see a jump of a whole gripper level in just a few weeks. So give them a try and have a great grip workout!!!
Sunday, May 15, 2011
Stronger Grippers with Thumb Training?
I just sent this out to my newsletter and thought I would post it here for those of you who still stop by.
I know that Grippers are one of the most widely recognized and most obsessive part of Grip Strength training.
Many people think that in order to close big grippers, they have to do a tremendous amount of gripper work ONLY.
While volume with the grippers can be a good thing, there are other ways to train the hands in order to improve gripper performance.
One such way to bring up your grippers without doing more gripper work is by training the thumb.
Now, you might be thinking, what does the thumb have to do with Grip Training?
Actually, the thumb is very important in a good solid crush because it serves as a foundation for the back handle of the gripper, especially the thumb pad.
Adding size to the thumb pad will actually strengthen your gripper power because that foundation on the back handle will be more stable.
For instance, check out what Chris Hope recently wrote in a comment on my blog regarding Home Made Strength II:
= = = = = = = = = = = = = = = = =
I got this downloadable DVD, and the info is great. I've made the modified pony clamp, and it has helped me to rep the COC#1, and I'm only 2mm off on the 1.5. The 8 week workout video is also great, giving me some great ideas for mixing up my grip training.
Thanks Jedd!
Chris Hope
= = = = = = = = = = = = = = = = =
If you are looking to increase your Gripper strength, then you HAVE to include some direct thumb work, and there aren’t many better or CHEAPER ways than the way I show you in Home Made Strength II.
In fact, the Thumb Clamp tool I show you how to build in HMS 2 might cost you $9 total, compared to $50 to $75 for other lever-style devices on the market.
If manhandling BIG GRIPPERS while SAVING nearly $50 is something you’d like to do, then check out Home Made Strength II.
All the best in your training,
Jedd
P.S. Just as Chris said, the HMS2 downloadable DVD is accompanied by an 8-Week Grip Program Video and PDF that will show you 24 other awesome Grip Exercises. Get ready to have a handshake that will break bones! Get HMS2 here = > Home Made Strength II
Sunday, April 03, 2011
The Common Thread - Grip Strength
Squat, Bench, Deadlift, Muscle-ups, Snatch, Clean, Jerk, Curls, Ropes, Pull-ups, Push-downs, Climbing.
What is the common thread between all of these awesome ways to train, get stronger and build muscle?
The Common Thread is your Grip.
If you are lacking in the Grip Strength department your performance in any of these lifts will suffer.
While it may be clear to see why Grip Strength is important in lifts such as Deadlifts and Pull-ups where your hands have to Grip something and be able to hold on well enough execute the movement, it may not be as obvious for other lifts, such as Squats. After all, your upper back is taking the brunt of the load when you Back Squat, right?
Let’s look closer.
What is Grip Strength?
Grip Strength is often referred to as just Hand Strength, but really it is much more than that. Yes, the hands are involved, but they are only a part of the equation. Really to have a truly strong grip, you must look as Grip as everything from the elbow down.
Here’s why.
Many of the muscles in the hands actually originate above the elbow at the medial epicondyle (some flexors, pronator) and the lateral epicondyle (some extensors, supinator). And since these muscles cross the elbow joint, they also influence the joint. Remember that point.
Because so many hand muscles start so far up the arm, it really expands the acreage that we have to consider when we set out to train for Grip Strength effectively.
Not only do we have to include training for the hands, but we also have to include work for the wrist, forearm and elbow.
Why Grip is Important for Your Training
Most trainees would agree that strong hands would be an asset for strength training and muscle building. After all, if your hands are strong, that means you’ll be able to pull more weight in many exercises, you’ll be able to do more repetitions, and you’ll be able to train longer if need be, right? Yes.
Now, let’s connect a few points. When your hands are strong you will see better results in the weight room because it will transfer to better performance when performing pulls like deadlifts, rows, and pull-ups.
But what about all the other lifts that do not involve pulling? Is Grip Strength important in those lifts as well?
Yes it is.
A strong Grip, or in other words, a strong and balanced hand/lower arm unit will also provide better stability during lifts where the hands are pressing against the bar, dumbbell or other implement. For instance, when performing the Bench Press, Jerk, Kettlebell Press, etc, you will be better able to execute these lifts when your grip is strong because you will have better control over the implement.
So is Grip Strength important for lifts like the Bench Press, Jerk, Kettlebell Press? Yes it is!
But what about other lifts like the Back Squat? It might seem like the hands are just sitting there going along for the ride, but if you are doing them right, they are doing much more than that.
You see, the hands are also capable of producing what is known as Radiant Tension. In other words, when you squeeze your hands, the tension begins to radiate inward toward the body. By doing this, you can actually increase the intensity of other contractions in the body.
The Back Squat is a perfect example of this. When performing this lift, you should apply appreciable tension to the bar by squeezing it prior to decent and continuing to apply this tension throughout each rep. By doing so, your upper body will remain more stable, thus allowing you to Squat more weight and do more repetitions.
So, now you can see that there are many benefits to be gained from Grip Strength training, right? So the next question is how are you going to get your hands on some equipment that will help you build Grip Strength and do so by hitting the lower arms from all angles?
Here are some examples of equipment you can buy to build Grip Strength…
Grippers – These things are obsessive and people really love training with them. They give you serious Crushing Grip and provide hours of training fun. Cost – about $20 apiece.
Sledge Hammers – These are great as well because they not only work the lower arms and hands, but they also incorporate a load of upper body and arm involvement, also contributing to your core training and cardiovascular health, especially if you use them to hit tires or other dense objects. Cost – about $30.
Thick Rope – These take your Grip, Arm and Shoulder training up another level of intensity, while also dropping bombs on your conditioning. Fantastic training tool. Cost - $90 or more.
Unfortunately many people these days are on a limited budget and it is tough to invest in tools like these and even though many pieces of equipment can be used to train for Grip Strength and other outstanding strength and conditioning benefits, their costs prohibit many people from purchasing them.
Here is the solution => Home Made Strength II: Grip Strength Edition. This on-line DVD is downloaded to your computer along with the bonus manuals and reports so that you can start building affordable pieces of quality grip gear that you can use to get a better grip and thus improve all of your other lifts.
As you can see Grip Strength is the common thread for many lifts. Don’t let it be the weakest link in your chain of strength.
Jedd Johnson
DieselCrew.com
HomeMadeStrength.com/homemadegrip.htm
Saturday, April 02, 2011
How to Improve Your Grip Strength for Real World Situations
Guest Article by Mike Rinderle
Strengthening your grip can help you excel in your chosen sport and in the gym, but what about your day-to-day life?
In this article we are going to look at 3 exercises that will help you look like a stud in real world situations.
Helping your buddy move: Nothing brings out the competitive nature in me like helping a buddy move. I do not want to be the first guy to have to put down my end of the cabinet, chest-of-drawers, or couch.
What usually gives out first in this real world test of wills is a person’s grip. Basically, moving furniture is a series of rim lifts with just your fingers or finger tips holding on for dear life.
To strengthen yourself in this area, find the heaviest Olympic plates you can, wrap your fingertips under the lip and hold for time.
Carrying groceries in from the car: I never want my wife carrying in more grocery bags than me, so I am always loading up the most plastic bags I can for each trip.
I don’t know about you guys, but 100 lbs of groceries hanging off individual fingers by those skinny plastic bags hurts!!! The key to making yourself impervious to the pain of grocery shopping finger torture… ring lifts.
Get some good quality rings that you can attach to a loading pin and do single and multiple finger ring lifts. Before you know it, you’ll own those plastic bags with no problem.
Opening a stuck jar: I don’t know about you, but I want to be the guy people hand the jar of pickles to when they can’t open it. There is nothing more embarrassing than not being able to open a jar and then have someone else pop it right open.
Opening a jar brings all kinds of grip strength factors into place: crushing grip, thumb strength, rotational strength. So any grip work you do will help in this test of strength, but the one that incorporates them all is the wrist roller. The one I have is made from a piece of 2 ½” PVC pipe. The larger diameter and smoothness really adds to the difficulty and you can set it up in a power rack in a couple seconds. It really hits the thumbs and forearms. Make sure you raise and lower the weight in both directions, and before you know it, you will be dominating any jar in the kitchen!
So there you have it. Three exercises you can add to your current workouts to become a real world grip stud! Have a great grip workout!
For more information, check out DieselCrew.com, a Grip Strength Training Site. It has hundreds of free articles on building superior hand strength. If you are looking for workouts that will show you how to improve you grip strength, check out his free program that includes 8 weeks of Grip Workouts.
Thanks for the article Mike!
All the best in your training.
Jedd
Friday, April 01, 2011
Trouble Bending the Grade 8 Bolt (Grade 5's are No Problem)

I hope you have been seriously destroying some crazy steel lately in your training.
I got my hands on the new nail from IronMind, called the Gold Nail the other day.
This thing is 8.375 inches long and 3/8 inches thick, so this thing is a monster.
I wanted to share an email I got this week from a subscriber named Erik, in regards to bending:
- "I do have a question. I already bought your e-book, and the progression chart helps a lot. But I'm stuck hard on grade-8 and have been for a few months. Is it better to have one or two big, heavy bending sessions a week, or grease the groove from day to day? I know gtg helps with a lot of big lifts, sometimes more so than exclusive workouts."
So, as it turns out, Erik can bend a Grade 5 bolt over and over. In fact, he has bent tons of them, but he's having trouble with the Grade 8.
If you are not familiar with the Graded bolts, we are talking about 6-inch long and 1/4-inch thick bolts that are made under strict manufacturing conditions to resist bending.
In fact, when you attempt to bend a Grade 8 bolt, it will actually flex back on you if you do not do enough damage to it.
Being stuck at a certain nail, bolt or steel bar generally is caused by one of two things.
Either you are not strong enough, or there is a problem with your technique, or BOTH.
As far as greasing the groove, I don't really buy into that for bending, personally.
Volume bending can be awesome for getting you used to bending, but I'm not sold on generating a pile of bent steel in order to move up the ladder. Besides, Erik is already slaughtering Grade 5's and it hasn't seemed to pay any dividends.
However, that does not mean that using Grade 5's won't help the situation. If you wrap electric tape or duct tape around the center of the Grade 5, you will reinforce it and make it tougher to bend. This would be my first suggestion, to see how far you can put a kink into it with your current technique.
The next suggestion I have is to run down through this post: How to Improve Strength for Bending.
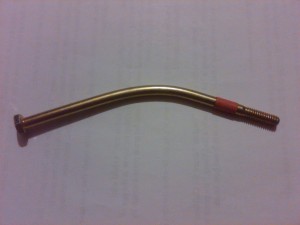
Grade 8 Bolt - Kinked
That post is all about improving the kink, and was written especially for someone else who was having trouble finishing off Grade 8 Bolts, so run down that post and see if any of the suggestions will help you out.
If you feel that strength is not the issue, then it is probably technique.
- Are you not loading tension into the bar?
- Are you standing too straight up?
- Are your hands too close together?
There are lots of variables here, depending on which bending style you use, what kind of wraps you use, your body type, the positions your body likes to operate in, etc. These techniques are all covered in extreme detail in my Nail Bending eBook.
So, in review, here are the steps I'd like to see Erik, the Future Red Nail Bender, try out.
- 1. Load up tape on the center of a Grade 5 Bolt and give it a try to see if you can get it (test your strength).
2. Review the "Improving the Kink" post, here: Force Production for Bending. (force production and technique)
3. Review the various technique run-downs in the Nail Bending eBook. See if there is something that might be off, and try changing things up (technique)
If it is not one of these two things (or a combination of both) then the only possible thing I can think of is that you are not attacking that thing like a savage beast.
Remember, you are doing something that you're not supposed to do. That Grade 8 bolt was not made to be bent with human hands. If it were, it would be easy to do, and what's awesome about that?
Attack it with a savage beast mentality like you are going to tear down an entire town with all of your rage.
Keep your technique dialed in and commence with the hostile takeover of the Grade 8 Bolt.
Hopefully this helps you out Erik - thanks for sending in the question.
If anyone else has a question, please feel free to do the same.
Be a Savage Beast!
Jedd
P.S. If you are struggling with a bend and need help, don't forget about the two best Bending resources on the planet: the Nail Bending eBook and the Nail Bending DVD.