Sign up for email updates!>>>

Friday, November 02, 2012

Simple, Effective, and Cheap Bullet Proofing


Ever wonder what it takes to bullet-proof yourself?
That is what I am going to graze the surface of today.

But first, I want to thank you all for being my
subscribers.  In the past couple of weeks, we have
added many new names to the list of passionate
strength enthusiasts who have come on board.

To all of you, welcome aboard.

Now on to today's topic, bullet-proofing.

By bullet-proofing, I am talking about doing 
everything you can to avoid injury.

There are so many ways you can get hurt if you
train hard and play hard.  You have to always be
thinking ahead.

We have to stay flexible, mobile, stable, strong, 
elastic, reactive - and the "buzz words" go on and on.

One of the injuries that is most important to prevent
is wrist injuries.

They might not keep you from playing, but they
often just nag you at random times.  They're gone
long enough for you to forget them and then all of 
a sudden they come up to bite you.

Soon, they get into your mind and before you
know it, you are thinking about all the time, even
when you aren't even playing sports or training in 
the gym.

My specialty when it comes to injury prevention is
the lower arms.  In my experience, if you train them
from all angles in balance, your risk of injury and
accompanying worry is greatly reduced, so check 
out this post on how to prevent wrist injuries on
my other website, DieselCrew.com.

This article contains 4 exercises that you can do with
the equipment you most likely already have to start
building your hardened exoskeleton and bullet-proofing
your lower arms and hands.

And if you don't have the stuff, you should get it, 
because they are all priceless pieces of training gear
for the grip and forearms.

= = = = = = = = = = = = = = = = = = = = = = = = = 
= = = = = = = = = = = = = = = = = = = = = = = = = 

Hope you enjoy it.  Any questions, just leave a
comment at the site.

All the best in your training and bullet-proofing efforts.

Jedd

P.S.  Like I said above, there are many things you need
to be aware of to stay at 100%.  Today's post will get
you started on one of them.  Implement these things
today so you can make yourself more injury-resistent.

Thursday, November 01, 2012

9 Tips on Injury Prevention

Over the summer, I was performing Strongman 
Shows at the Fayette County Fair in Dunbar, PA.
 
It was a great time and the kids
and parents alike seem to have enjoyed watching
me bend horseshoes, tear cards, and bend spikes
while lying on the bed of nails.
 
This was the first time I ever performed
Strongman Shows of this kind, so it 
was a bit of a learning experience.
 
One of the main things was having to go from
totally cold to being able to perform at a very 
quick rate, to avoid injury.
 
So, I am going to list a few of the things I am
doing to stay injury free while doing the shows.
 
I realize not all of you perform strongman 
exhibitions, but if you compete at Grip Sport,
Strongman, Powerlifting, or other sports where
you cycle bouts of activity and inactivity, then 
keep these tips in mind.
 
= = = = = = = = = = = = = = = = = = = 
 
1.  Stay Hydrated
 
I have written several times about  the importance
of staying hydrated.  Your muscles just won't work
if you don't have enough fluid in your body, and 
a couple days have been in the 90's so fluid loss 
happens quickly.
 
To stay hydrated, I hit my regular two glasses of 
water when I wake up in the morning, and
continue to do so throughout the day.
 
This has kept away the dreaded full body cramping
that my buddy John Beatty warned me about due
to lack of hydration and salt.
 
2.  Get Enough Vitamins
 
After the first day, I was feeling run down and
realized I wasn't getting enough fruit and veggies.
I have still not found a booth selling this stuff
at the fair so I bought a bunch of oranges, bananas,
berries, nuts, and mixed veggies at Walmart.  
This made a huge difference for me.
 
3.   Get Enough Salt
 
I mentioned the nuts that I am eating throughout
the day.  I also have a back of sunflower seeds.
From my old baseball days, I can crack sun-
flower seeds like a champ.  I don't do it during
the shows of course, but they are helping me
keep some salt going into my body.
 
I also grab a few slices of bacon from the 
breakfast bar and stick those in a little baggie and
much on those between shows.  Some sea salt
would probably be better, but I am making good 
with these sources.
 
That's about it for me dietary approach. Now,
onto some more physical tips.
 
4.  Solid Warm-up
 
Starting 15 minutes before each show, I am 
running myself through a warm-up to get
my joints well-lubricated and ready to go.
 
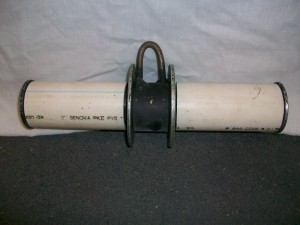
I start out with some rolling on my cardboard
pipe (foam rollers are cool, but I like this better).
I hit my lower back, rib cage, lats, glutes and 
hamstrings to get rid of some adhesions, 
promote more blood flow, and adjust my
thoracic spine.
 
5.  Back Wrap
 
I have just a cheap-o Walmart Back Wrap that 
I use to keep my lower back warm.  It works as
well as anything else I have tried.  There are 
more expensive options on the market, but I 
bought this when I was on the road for a 
Strongman contest back in the day and have 
loved it ever since.
 
6.  Nettles Patch
 
On the inside of my back wrap I have two 
patches which also contribute to blood flow
into the lower back called "Netical Patch." 
While walking through Nettles  can make you
break out into an annoying rash, someone 
figured out how to turn them into an awesome
patch.  These come from Nettle Farms Inc., and 
their website is transdermalinnovations.com, if 
you are interested in checking them out.
 
7.  Don't Sit Down
 
I try to avoid sitting down during the time I am
at the fair like I am trying to avoid the black
plague.  If I need to rest, I generally try to lean
against a wall instead of sitting down.  I do
enough sitting down while working to last me 
the whole day, plus when I do, it makes me cool
down and makes my hips freeze back up.
 
8.  Layer Up
 
Believe it or not, once I get all sweaty during
a show, once I stop, if the breeze is going I
start to feel cold, so I immediately throw on
an extra tee shirt.  Rain has been hitting the
fair off and on, and keeping layers on between 
shows has helped to keep me from catching
a chill when it is storming and when the sun
goes down.
 
9.  Elbow Sleeves
 
I am susceptible to elbow pain, and I am doing
more bending over the course of these 6 days
than I have in the last year, so I am being extra 
cautious and wearing my elbow  sleeves during
the shows.
 
This is just one of the many ways you can keep
elbow pain like tennis elbow and golfer's elbow.
If you are susceptible to this as well, check out
our ebook, Fixing Elbow Pain.  In it I cover dozens
more practices you can do to prevent elbow injuries.
 
Well, DIESELS, there are 9 things you can do to 
prevent injuries, whether you are doing Strongman
performances, competing in Strongman, Powerlifitng,
or Grip competitions, or doing any other kind
of sport or activity that involves periodic lulls
of action over the course of several hours.
 
All the best in your training,
 
Jedd

Wednesday, October 31, 2012

Building the Better Mousetrap

I bet you have heard someone, some time in your life mention "building the better mousetrap."
 
Did you know that Ralph Waldo Emerson is credited with first making this statement about  innovation and ingenuity, but actually he said something completely different and was misquoted several years after he died.
 
It's true - I just read it on Wikipedia, so it has to be right?
 
Anyway, the mousetrap is something we can all identify with.  I bet most if not all of us have used mousetraps to catch a mouse or rat at one time or another.  And many of us have heard it snap in the next room, but when we go to check and see if we got the mouse, we sometimes find that it was able to steal the piece of cheese and get away before getting caught.
 
Thus the need for a "better mousetrap."
 
Well, I guess you could say that the Hand Grippers and Gripper Machines are the mousetraps of the Grip World.
 
We've all got some type of gripper or grip machine.  Maybe they are torsion spring grippers (like the Captains of Crush), adjustable spring grippers (like the Vulcan Gripper),  or maybe they are floor-model grip machines with moving parts that you add weights to in order to modify the resistance (there's LOTS of these).
 
Well, I am writing today to tell you about a training device that may just be "The Better Mousetrap" when it comes to Gripper Machines, Pop's Grip Machine from Sorinex <= = Click the link for a video review of it.
 
Here's what sets Pop's Grip Machine apart from other...
 
If you have experience with Torsion Spring Grippers like the Captains of Crush, you know that the hardest part about closing the gripper is the last little bit of space between the handles.  You might sweep your #3 gripper down to 1/8th of an inch, but then it might stop dead in its tracks.
 
Pop's Grip Machine mimics this increase in difficulty through the use of some special "attachments" you can use that come with it.  Watch my review video to see what I mean.
 
This is like no other device I have seen.  If you want to see something the Better Mousetrap of Grip Machines, then I suggest you check this link out:   Pop's Grip Machine from Sorinex  (fr.ee review - I receive no commission if you buy one)
 
I thought this was a really cool concept.  I am interested in what you think, too, so feel free to leave a comment.
 
All the best in your training.
 
Jedd
 
P.S.  If you are frustrated with your gripper training, check out my DVD, CRUSH:  Total Gripper Domination.  It has helped many people break through their gripper training plateaus.  Check out what Richard Marby had to say:
  
"I've gone from 2-3 closes on a CoC 2 to 6 in about a month of work, and grip is not my primary goal right now. Thanks for a great DVD!"
 
Sometimes, all it takes is a little guidance to make huge gains in your training.  You provide the effort and hard work, and I can help you out with technique, and know-how.
 
You might say my CRUSH DVD is the Better Mousetrap when it comes to Gripper Training and Instruction.  Pick it up here


Tuesday, October 30, 2012

What is the Modular Grip System?

Variety and Convenience.
 
These are two things I am always looking for
in my training.
 
Having Variety allows me to constantly be
challenging myself in the gym with new and
different pieces of equipment.  This keeps the
gains coming and the PR's piling up.
 
Convenience is very important to me because
I have limited space for training and don't want to
waste time setting stuff up and breaking stuff down. 
I want to get in, get the work done, and be able to
get out of the gym and enjoy my time with my family.
 
Maybe you are like that too?
 
Well, I've got a buddy named Ryan Pitts.  Maybe you
have heard of him.  He runs a company called
Stronger Grip Enterprises.
 
Last week Ryan contacted me and let me know
that has put out a brand new grip training equipment system.
 
He is calling it the Modular Grip System.
 
The Modular Grip System is a training equipment
kit with loading pins and interchangeable parts. 
This means that it will allow you to train various
aspects of grip strength with a small collection of tools.
 
The MGS, as it is called, comes with two loading
pins and various plug-in style handles which attach
to these loading pins.  Let's run down the handles
that come within the system:
 
1.  Two Hand Pinch (normally $59)
This is a steel implement that attaches to the loading
pin and allows you to train open hand strength and 
thumb strength, two very important aspects of grip
which have carryover to all sorts of athletic activities
and sports.
 
2.  Plateau Buster Handle (normally $149)
This is another steel implement that is used to train
true support strength.  The handle is about 1 inch in
diameter, meaning just about everybody will be able
to wrap their hand completely around it and strengthen
the grip for deadlifts and other pulling movements.
 
3.  A 2 3/8-inch Vertical Bar
This device allows you to train in an ulnar deviated
open hand position.  You've probably seen vertical bar
training before, but if not, think gripping a giant office
water bottle by the neck, or trying to pull a 2 and 3/8
inch thick horseshoe stake out of the ground.  This
joint orientation is also very similar to pulling on a
long rope.  Awesome for serious hand strength.
 
4.  Thick Burger Grip
This is pretty much a new device for me, but it is very
similar to block weight training.  The Burger Grip is
pill-shaped.  Imagine lifting a giant aspirin tablet. 
Sounds like fun, doesn't it?
 
You can see pictures of all the devices included in
the Modular Grip System here.
 
Check it out.  If you're looking for a good set of
equipment that is going to last you a long time,
then this could very well be perfect for you.
 
I own all kinds of Ryan Pitt's Stronger Grip
equipment and it is all top notch.
 
In terms of workmanship, much of Ryan's equipment
BLOWS AWAY his competitors in  terms of quality
and aesthetics, plus they are built to last.
 
Another thing I like about Ryan's equipment is his
loading pins.  You don't have to mess around with
carabiners, so you save even more time that way.
 
Looking at the new design, I think this version of the
Plateau Buster will be even better than the first version
for dynamic training such as swings, because the plates
will be loaded vertically instead of horizontally
 
I still use mine to this day for heavy two-handed swings
because I can actually get both hands on the handle fully,
something most people are unable to do with kettlebells.
 
I hope Ryan puts up records lists for this equipment
I know it is always fun to see how much you can pull on
new pieces of equipment, but when there are public
listings available on sites like his, it makes it even more
fun and allows you to challenge yourself for years down
the road as well.
 
So, make sure you check out the Modular Grip System
from Stronger Grip.  Right now it is just $199 for the
whole package.  That is the regular total for the Plateau
Buster and Two Hand Pinch handle. 
 
If you get the MGS right now, you will essentially
get the  Vertical Bar and Burger Grip handles for fr ee.
 
Enjoy and all the best in your training,
 
Jedd
 
P.S.  Ryan has indicated that he is working on other
prototypes that will be coming out later as additional
plug-in handles for the Modular Grip System
So that means even more goodies to come!


Sunday, October 28, 2012

Tough Kettlebell Grip Shit


I’ve said for years that Grip Training is one of the
most important types of training that most people
are NOT doing.


A Strong Grip helps you perform better in sports
 by being able to hold onto the ball, bat, or your
opponent better.

A Strong Grip also helps you improve your
numbers on lifts where the hands are involved,
especially the all important Bench Press. By
having a firm grasp on the bar, it helps you engage
your upper body in the lift much better while also
 increasing your confidence in the lift, knowing
you are going to dominate it with no problem.


Finally, Strong Hands and Forearms are Safer
Hands and Forearms.


What I mean by that is when you have put in the
work to strengthen everything from the elbow
down in a balanced fashion, it makes you much
more injury-resistent. You are able to take more
bumps without having to worry about breaking
something and you’re able to give more bumps
without having to hold back.


The issue with all this is, how do you get started?


People make Grip Training out to be a lot tougher
 than it is. In fact, if you have a small kettlebell in
the 15- to 30-lb range, you’ve got exactly what
you need in order to start training your grip and
start reaping all the benefits.


Kettlebell Gut Pops (Full Hand Emphasis)


Forget the fact that the kettlebell has a perfectly
good handle on it. Instead, pick it up by the belly
or Gut. Next, pop it up into the air and try to grab
 it with the other hand.


In the pictures above, I am using a 30-lb Kettlebell.
However, take note that I am not as much of a
bad-ass as I may seem THIS TIME, because this
kettlebell has a rubber coating around it. If you have
 one that is bare iron it is going to be much tougher.


Kettlebell Front Raise (Thumb Emphasis)


Again, Grip the Kettlebell by its round gut with an
open hand. Next raise it up in front of you like a
front delt raise, making sure to keep the thumb
positioned on the bottom of the bell in order to
hit it the hardest way possible.


If you are a true tough guy, try holding it up for a
pause on each repetition.


Kettlebell Horn Deviations (Wrist Emphasis)


Grip the Kettlebell this time by the “horn,” which
is the part of the handle that is generally vertical.
From there, lower the bell down into ulnar
deviation and then back up into radial deviation.


 If you love the pain and torture of this variation,
you should also try supinating and pronating the
forearm. LOVELY!

There are thee Grip Training movements you can
start doing RIGHT NOW in your routine to get the
benefits of stronger lower arms and hands.


If you want more ideas on how to be a bad-ass by
lifting crazy shit and bending and tearing everything
in site, check out The Grip Authority. I’ll tell you how
to build the strength to be able to rip phone books,
 tear cards and bend steel.


Now, go Lift or Destroy something.


All the best in your training.


Jedd Johnson, CSCS, RKC

Captain of Crush | Red Nail Certified

See more on building ridiculous hand strength = > http://www.thegripauthority.com

Friday, October 26, 2012

Kettebell Swing + Grip Training Benefits

Grip-Friends! 

You want information on
improving your Grip Strength, and I am bringing
it to you!
Here is an article on a device called
(Just in case you didn't know, when I was 
training to be a pro-wrestler, my name was 
going to be Napalm Jedd.)

Kettebell Swing + Grip Training Benefits
 
Kettlebell Training is a very beneficial form of
training that is naturally good for improving
your grip strength.
Kettlebell work helps improve hand strength 
so well, because of two natural properties of
kettlebells: 

(1) The increased size of the handle,

and

(2) The dynamic nature of the training.


1. The Increased Size of the Handle
One of the easiest ways to INSTANTLY
hit the hands harder in order to bring up your
grip strength is to increase the size of the
handle of whatever it is you are training.

The "handles" we often train on are barbells
and dumbbells, which are often only about
1-inch to 1.25-inches.  For most people this
is not going to do much to stimulate grip
strength improvement unless you load up
extremely heavy and hold for long periods
of time.

Plus, dumbbells and barbells are almost 
always knurled, in order to assist with the grip
you can get on them.

With Kettlebells, however, the handles are
generally slightly bigger, often in the 1.5-inch
range, which still isn't huge, but throw in the
fact that their handles are NOT KNURLED
and you have a tool that will test your grip
strength more than standard equipment.

Now, let's look at the other side of the equation...

2.  Dynamic Nature of the Training

Kettlebell Exercises, especially Cleans, Snatches
and even the basic Swing all require a pendulum
motion where the Kettlebell swings downward
and then you pull it back up.

Add in the fact that sets generally include between 
20 and 100 repetitions and you have a great deal
of  dynamic loading to the hands, which can be
great for increasing your grip strength.

So, the handles are larger and slicker, which will 
make your grip work harder.  PLUS, the movements
are often more dynamic, bringing in another element 
of difficulty...

So everybody should go get a set of Kettlebells, right?

Well, while I do think Kettlebells are awesome pieces
of equipment, there is one main drawback...

They can get quite expensive.

Kettlebells can be picked up ranging from 12 pounds
all the way up to over 100-lbs, and all that iron brings
a price with it.

Well, I want to tell you about an innovation 
I came up with a few years back called the 
Napalm's Nightmare.
 
(If image does not appear, click this link)
This is a Home Made that is connected to a
loading pin with weight added and then swung
just like a Kettlebell Swing is performed.

The Napalm's Nightmare device combines 
the thick, slick handle of the Kettlebell with
the dynamic nature of the Swing, but takes it
two steps further, because not only are the
handles even larger than regular kettlebell
handles, but they also rotate as well. 

These two traits of the Napalm's Nightmare
make your hands scream for mercy, in a good way.

Here is the best picture I could find, which I 
pulled from a video on-line, where I am 
performing Swings with Napalm's Nightmare:

At this point I have propelled the implement
forward with my hip strength, but due to both
the size and the rotating action of the NN handle,
your hands must work 2 to 3 times harder to
keep your grip on the handle.

Plus, at the bottom of the swing, when it passes
down and beyond your hips, you have to 
overcome the momentum of the implement,
again requiring a greater grip engagement than
regular kettlebell swings.

So, obviously, I am either a genius for innovating
such an awesome device, or I am downright evil for
thinking some up so intense.

Either way, if you use one of these, your hands, 
wrists, and forearms are going to get Scary Strong,
and that is what training is all about.

Unfortunately, I don't sell these implements.

BUT, I do show you exactly how you can make

In fact, not only do I show you how the 
Napalm's Nightmare is made, but I also show you
how to make 10 other Grip Training Tools.

If Grip Strength is something you need to
work on, you are going to need some good 
quality equipment to train with.

Home Made Strength II will help you expand
your Grip Equipment Arsenal and you'll be 
able to save a whole bunch of cash as well.

For more information and to find out exactly
what you can learn to build check out 

All the best in your training,

Jedd

P.S.  This video comes in a Digital Streaming
format, but you can also upgrade to the Physical
DVD as well.  Just go here

Thursday, September 27, 2012

Grip Strength Program

 
I hope you are doing well and your grip strength
is improving everyday.

Hey, I got an interesting question regarding
the 8-Week Grip Program that you get when
signing up for this newsletter.

I have gotten this question a couple of times over
the last few months, so I thought  I would send out
a note to everyone about it.  Check it out below:

"What experience level would you say this program is?
Would it be a novice, advanced, expert, or world class?
I'm thinking it's in-between novice & advanced for the 8 week program."
-Ben-

Ben, thanks for writing in.  Like I said, this is a question
I have received many times.


By the way, if you haven't signed up for my newsletter
and gotten this free program, you can do so here.

It is probably best to label this a "Training Layout"
than a program.

I say this, because when I designed it, I wanted to put
together something that was encompassing of all the
various types of Grip Strength:  Crushing, Supporting,
Pinching (both static and dynamic), Open Hand, 
Crimping, Clamping, as well as tests of forearm strength.

The idea was to provide something that would show
everyone who gave it a try a variety of lifts and difficulty
levels.

There may indeed be lifts or challenges in this layout 
that at this time you are not able to do.  

This is not to make you feel weak or anything like that.
It is simply to point out where you are at right now
as well as how far you can one day reach.

When I first started out with Grip I was NO WHERE
near where I am now and I would never have been
able to do all of the  lifts that are included in the
8 weeks of workouts.  

Believe me, I have been at this a long time, and if it
weren't for hard work, dedication, and consistency,
I never would have reached the level I am at, nor
would I have ever been able to perform all the lifts
that I laid out and demonstrated.

The total truth is that I had trouble filming all of the
lifts in the PDF and video!  It was a ton of work to
shoot it all in one day.  In fact, I was down-right
tired during the filming and pretty sore the next day!

So as you go through the program, if you are unable
to do something, no problem at all, my friend!

What I would suggest is to print out the PDF and 
take it with you to the gym and as you try each lift,
make marks in the margins beside the lifts that
say whether you were able to do them and also 
indicate how challenging they were.

After a few weeks or maybe months, you may
look back and realize that what was really tough 
for you at the beginning of the "program" is now
much easier.

At least that is the goal...

Once you work your way through all 8 weeks and all
24 different lifts, you should have an idea of where
you lie as far as your grip strength levels.

You will also know what you need to work on as far
as weaknesses, and hopefully by being introduced to
so many different lifts, you can lay out your own 
specific program in order to address your weaknesses.

Most of all, this program is meant to be fun.  That is
why at one point in the program I say, "Now you are
really going to hate me," or something along those 
lines.  While grip training will undoubtedly help you
out in other aspects of your training, it is also a very
fun way to train with nearly endless ways o changing 
things up and keeping them exciting.

Feel free to substitute things if you don't have the
equipment.  For instance, if you don't have a thick-
handled loadable dumbbell to train with, use a set
of FatGripz.

If you don't have a 45-lb Block Weight to use, feel
free to use an inverted dumbbell or something else
that will be similar to the suggested equipment.


And at any time, feel free to write back to me and
 ask me questions.

I also do consultations for setting up Grip Programs,
where I help you lay out more traditional programs 
with the purpose of helping you attain your 
specific grip training goals.  My fees vary, depending
on exactly how much help you need, so please feel free
to write in and ask or call me.

And finally, don't forget about my coaching site, 
TheGripAuthority.com - I have tons of great info
there and it is dirt cheap to get started.  Just $7 at
the beginning and $17 after that.

At TGA, the members of the site are able to view
all of the content I have uploaded since Day 1, right
from the beginning of their membership, and I have
made a lot of changes to the site over the years to
make it as user-friendly as possible.

One of the most popular features is my monthly 
Coaching Call Recording, where I field the members'
questions, and answer them as best I can to help
them out with all of their biggest goals and aspirations.

Again, I hope you are having fun with the 8 Week 
Program and that it is helping you learn more about
Grip Training while also having a great time doing it.

Thanks again for signing up and let me know if you
have any more questions.

All the best in your training,

Jedd

Wednesday, September 26, 2012

 
Ever since Mike Rinderle and I teamed up to put
out the Hammering Horseshoes DVD last year,
the popularity of Horseshoe Bending has
dramatically increased, because we effectively
removed a lot of the mystery involved with it.
 
But still, there is the occasional question that pops
up, especially regarding padding and wraps.
 
Here's a recent one that Mike got through YouTube.
 
"Mike
In the DVD you talked a little about 180
degrees being a legally bent shoe but I was
curious if there are other rules when it
comes to bending. I know you said the
wraps have to pass through a 1.25 inch hole
but are there any rules on how much
padding you can use? I would assume you
can not use anything hard. I saw you using
a piece of foam padding on top of a towel
in a couple of your vids and was curious
about that as well?
Jason"
 
Great questions, Jason.  Now, I will turn it over
to Rindo for a look at the rules for Wraps and Pads:
 
"From Rindo:
 
Rules on Wraps for Horseshoe Bending
As you mentioned, the standard is to have wraps
that can be passed through a hole in a piece of wood
or other sturdy material that is 1.25" in diameter
when all rolled up.  This is simply the standard that
was decided upon many years ago when Grip and
Feat of Strength Enthusiasts started developing
standards for feats of strength that in the past did not
have any standards developed.
 
Essentially, what is done, is the wraps that are to be
used are rolled up in the direction they would be
wrapped over the ends of the shoe and then each
one is passed through the 1.25" diameter hole.
 
Rules on Padding for Horseshoe Bending
The main rule on padding is that it cannot be rigid. 
I have found that using a folded up hand towel
works best for me.  Just enough to dull the pain,
but not so much that it doesn't let you impart full
force. 
 
What I mean by that is, if the padding is too soft,
it will just compress beneath your force.  Plus,
there is a point you can reach where you add so
much padding that you have to use even more
force than normal to bend the shoe further, which
is no good either.
 
Bending horseshoes without any padding is not a
good idea for most people.  I used to bend a lot
of shoes without padding, but I hurt my thigh so
bad once, I ended up in the doctor's office due to
a blood clot.  I couldn't bend shoes for almost two
months.  So now I almost always use some padding. 
 
In the video where you saw me using a towel and
some foam, I was working on a shoe that was a
personal best for me.  I have a system I use when
I am gunning for new PR's where  will go for
maximum padding and maximum wraps and then
work my way backwards toward the standard
until I can finish ti no problem with the exact
requirements for competition and certification lists.
 
Thanks again for writing,
 
Mike Rinderle"
 
As you can see, Mike has a little system for every
type of Bending, especially Horseshoes, that is
why he was successful in becoming the first ever
United States All-round Bending Champion.
 
And what's amazing is that doesn't even scratch
the surface of Mike Rinderle's knowledge. 
 
If you really want to learn Horseshoe Bending,
then pick up Hammering Horseshoes
 
All the best in your training,
 
Jedd
 
P.S.  If you haven't heard of the Hammering 
Horseshoes DVD before, here is the Chapter List:
 
1.  Introduction
2.  Special Recognition
3.  Horseshoe Progressions
4.  Warm-up / Injury Prevention
5.  Wrapping
6.  Padding
7.  Quick Re-wrap Method
8.  Jedd:  Raw, Uncoached
9.  Mike:  Demo Bend
10. Completed Bends
11.  Kink Technique
12.  Sweep / Crush Technique
13.  Leg Crush Technique
14.  Jedd:  Refined, Improved Technique
15.  Mike:  Elite Shoe Attempt
16.  Exercises for Shoe Strength
17.  Closing
18.  Extras
 
As you can see, we cover all the bases in this
DVD, and if you have any questions at all,
do not hesitate to ask.  We're glad to help
you out.
 
Pick up Hammering Horseshoes, here.


Wednesday, July 04, 2012

The Forearm Pain Paradox


paradox - A statement or situation which defies logic or reason

Today I am going to tell you about the Forearm Pain Paradox.

Imagine being able to bend spikes and steel bars with your hand and wrist strength, but not being able to turn a door knob to pen a door.

Imagine being able to lift a world record weight in a strength contest, but not being able to straight your arms to do so.

Finally, imagine being dog-tired from one of the best workouts you ever had, but not being able to fall asleep because your forearm hurts so bad you can't find a pain-free position.

All of these scenarios are things I have lived with over the years.

My name is Jedd Johnson, and I am from DieselCrew.com.  I am a strength coach, and my passion is Grip Strength.  I love bending nails, tearing cards and phone books and own world records in grip.

But I am also just like you.  I know what it is like to have workouts hindered due to the annoying nagging pain that can happen up around the top of the forearm and elbow.

Chances are, if you have been training hard for a while, or if you do a lot of hand-intensive manual labor, you have had bouts of forearm pain like this too.

Maybe, you're even suffering from it right now.

Forearm pain, especially up near the elbow, creates what I call the Forearm Pain Paradox.  What I mean is, you can have strong hands and wrists, and lower arms capabable of absolutely astonishing feats of strength and power,  but your grip goes completely to shit when you have high forearm and elbow pain, especially medial and lateral epicondylitis.  There are so many attachments in that small area near your elbow, if something goes wrong, it's like the strength you've worked to build up for years works against you.

The same goes for big movements, like bench press, overhead press, squats and deads.  You can be a damn monster in the weight room, but if you get high forearm or elbow pain bad enough, you can kiss PR's goodbye...

Forearm pain SUCKS, and thousands of people get it each year.  In my estimation, I have had what is referred to as medial and lateral epicondylitis, and more commonly known as Golfer's Elbow and Tennis Elbow, respectively, about 10 times since 2003. 

The Causes of Forearm Injuries


I know a lot of you love getting into the meat and potatoes behind all of this stuff, so here it is in a nutshell.

Medial Epicondylits (ME)  - Golfer's Elbow


M.E. is an injury to the common flexor tendon which originates from the medial epicondyle, a bony structure high on the elbow, and on the underside.  That just means a lot of the flexor muscles start there.  It also means that if you do a lot of movements where you are flexing your hands and wrists, you could end up with this problem.  This is also caused by a valgus movements, where the forearm moves out away from the body, but the upper arm stays close to the body, like the back arm of the golf swing, which is why it's called Golfer's Elbow.

Lateral Epicondylitis (LE) - Tennis Elbow


L.E. is nearly the same as M.E., but the difference is that it takes place in the common extensors tendon, which is on the back of the forearm, and attaches on the top part of the elbow.  This one is caused by rotation and extension movements.  Even just straightening the arm can lead to it, so you don't need to rip, bend and tear things to cause issues.  Just the basic pressing movements can do it.  Tennis players get this because of the drag that takes place when swinging the racket in a back-hand strike.


What Can You Do about These Conditions?


Now that you know what these conditions are with their supped-up names and bad attitudes, it's time to discuss what to do about these conditions.

First and foremost, preventing these conditions is a lot more fun than getting them.  Like I said, I have had both of these full-blown conditions about ten times over the years, from 2003 until 2009.

In 2003, I was bending steel and lifting stones like a mad man, but when it came to turning a door knob, my knees would buckly because of the pain.  Several times, the pain was enough to keep me awake at night, and my most recent case of full-blown LE, the injury was so bad, that I needed to wear elbow sleeves with tiny heating packets in them in order to keep the area warm enough to straighten my arm to pick up weights from the floor.

In 2009, I decided I'd had enough of this crap, so once I rehabbed it that last time, I began implementing a battery of preventive exercises.  I still do all of my feats and compete in Grip Sport contests, but now, I am smarter about it.

Surprisingly, the Preventive measures add almost no time to my training at all.  They are so simple, I often wonder why I didn't start doing this stuff way back in 2003.

The principles I use involve promoting strength in the extensor muscles, which open the hand.  This keeps a strength balance between the extensor muscles which open the hand and the flexor muscles which close the hand, and keeps the lateral epicondyle and the tendons that connect to it in good working shape.

Other things like a good warm-up and keeping the area warm during my training (also known as common sense) have paid huge dividends in my training, allowing me to train longer, miss fewer workouts, and compete at a higher level.

So, I have become very good on the Preventive side.  In fact, I wanted to put together an ebook to help others prevent these types of injuries from occurring at the forearm and elbow, but I soon realized that it would be a complete waste of time for many people, because so many people are already bother by this kind of intense pain.

That was when I knew I had to track down somebody that was experienced at rehabbing this kind of injury.  That was when I tracked down Rick Kaselj.  Rick has many certifications behind is name, but that is not what is important.  What really matters is the fact that he has already helped so many people in the past get through injuries.

I contacted Rick about putting together something with me for forearm injuries like this and he agreed.  Within a short time, we had developed the main outline of Fixing Forearm Pain - Medial and Lateral Elbow Pain Fix for Athletes and Lifters.

Rick and I released this new product this week, and we know that there are a lot of you out there who are struggling with forearm pain.   That is why we opened it up for this week at such a dirt cheap price - $19.  That is less than my co-pay when I go to the doctor!

If you've had forearm/elbow pain for a while, you know how bad it can affect your training, strength levels, attitude, and night-time rest.  Grab our ebook and study Rick's portion, where he outlines his professional approach to rehabbing elbow pain

And maybe you've never had pain like this, but you know that the training you do could one day cause something down the road.  In that case, check out the manual and dive into my section, where I talk about the Preventive Methods I have used for the last couple years to keep high forearm and elbow pain from coming back.

I know this manual is going to help a lot of people, so make sure to get it before Friday, because then the price is going to increase.

All the best in your training,

Jedd

P.S.  Don't be the "I'll wait to later" guy.  You and I both know that later never comes, and if it does, it might be too late to grab Fixing Elbow Pain for less than a 20-spot.

Monday, July 02, 2012

Got Wrist Pain?

I bet you have had wrist pain from time to time,haven't you?
Any sort of training or sport can bring about pain.
One spot that gets  jacked up more than others is the wrist
 
If you are active in sports, it might have come  about from a hard hit or other sort of trauma.
Lifting can cause issues as well, like if a pressing or jerk-style movement goes slightly wrong.
Even lifts like squats and curls can mess up the wrist from time to time.
Did you know the wrist has 8 little bones in it that are all arranged in a specific way in order to provide proper movement, function and strength at the wrist joint?
Many people do not realize this, but it is true.
And if any of those little bones gets thrown out of whack by getting tackled or during a lift where technique goes wrong, then you can have some pretty serious pain that greatly reduces your performance.
I found an awesome and completely free resource that shows you the construction and layout of the wrist joint.  As you move your cursor above the parts that make up the wrist, you can get even more info about the role these parts play.
Here's the link if you are interested in learning more:  The Wrist (no charge or email opt-in to view this)
Getting rid of wrist pain can be tough to do sometimes, but I do have a few suggestions for you.   Remember too, this is coming from somebody who  isn't a doctor, but has had his share of wrist injuries in the past and has found ways to get rid of them quickly.
1.  Go to a Doctor for a professional diagnosis
You have to start by learning what exactly is wrong.
They may have you go for an X-ray or MRI to see exactly what is going on. 
If it is a miss-alignment, that can usually be fixed pretty quickly.  If it is some sort of a tear, then there might be more intensive work required.
But either way, the best thing is to see exactly what you have going on there to plan your therapy and recovery.
2.  Go to a Chirporactor
Most Chiropractors do not only work on the back and neck, but also the other joints as well. 
I have had my Chiropractor adjust my wrist no fewer than 20 times over the last 10 years, and sometimes when I go in for a tune-up, I have her hit my wrists for good measure.
3.  Do Something Different from What You are Doing Now! 
Many people put treatment off for weeks, months, or even years before they do anything. 
All of this results in lost training time and possibly a condition that you can never fully recover from.
Whether it is because you don't have, lost, or can't afford insurance, or whatever the case may be, you've got to try something to get out of pain.
If you are fed up with wrist pain, I have some suggestions for you in Fixing Elbow Pain. 
Although that program is designed primarily to treat and prevent injuries of the elbow, a lot of the drills that I show you can be used for the wrist as well.
You can get this product by clicking here
If the price of a doctor visit is as scary in your home town as it is in mine, my $27 ebook might be a little easier pill to swallow.
One technique in that ebook I showed to my subscribers at my Grip instructional site, TheGripAuthority.com, and after using it just one time, one member experienced immediate relief.
I wouldn't sit here and guarantee that fast of results for everyone, but who knows?  You're sick of your wrist pain right?  So is it worth a try?
I will tell you for certainty, that these days, any time I feel anything weird with my wrist I march my ass downstairs and use this technique.
You can do a Test Drive of TheGripAuthority.com for just $7.  Now I know that's less than what you'll pay your doctor.
Like I said before, all of the tactics I show people are things I have used for myself to recover from injuries and then later on to keep them from coming back. 
I am not a doctor, don't profess to be,  nor do I want to be, but these little tricks of the trade I have picked up sure do help me get people out of pain, especially when it comes to the hands, wrists, forearms and elbows.
If you are tired of dealing with pain then click on one of the following two links.
Check out Fixing Elbow Pain here.
Check out The Grip Authority here.
Let me know if you have any questions.
All the best with your training.
Jedd

Sunday, July 01, 2012

Grip Training: Benefits of Sledgehammer Training

If you don't currently have a Sledgehammer to train with, I suggest you march right out and get one right now.  There are so many benefits of sledgehammer training, it is just a great way to spice up your training.
You get them at just about any store, or even right off the Amazon Website.
Speaking of Sledgehammers, I put up a new post on the site about someone who as done more impressive things with Sledgehammers than anyone walking the Earth - Slim "The  Hammer Man" Farman.
Here's the post <= My Knuckles Were Sore
Slim is famous for some unbelievable feats with hammers, many of which I would have to specialize on in my training for years in  order to match and most likely still never come close.
However, I was surprised to see some remarkable progress in one particular feat Slim is famous for which has been called "The Slim Lever."
Check the new post out to see how it's done.
Now, as I said, there are many benefits to Sledgehammer Training, and it is a good idea to have at least a 6-lber in your arsenal if you are a woman and an 8-lber if you are a man.  Let's run down some of the benefits of sledgehammer training.
1.  Grip Strength
It takes a concerted effort between the forearm, wrist and the hands to maneuver a Sledgehammer. 
It doesn't matter if you are swinging it around with faster movements, or if you are being more strict and controlled with it, Sledges will light you up.
To give you an idea of the many ways you can  use these for Grip Strength, you can use them in strict movements to strengthen the wrist movements of nail bending, you can use them more dynamically to strengthen faster movement patterns like a golf or baseball swing, and you can even add weight to them and rotate them like a wrist curl. 
All of these techniques are easy to set up but blow your forearms up and give you much tougher wrists and hands. And honestly, we've only scratched the surface of what you can  use them for.
2.  Cardio
If you are looking for a new to train for some cardiovascular  fitness, then try swinging a sledgehammer and striking a tire or a tree stump. 
Try just 30 seconds of constant overhand swinging and you will see just how demanding it is, even with a relatively light sledgehammer.
3. Shoulder Health
Most people don't think of this one, but it is true, sledgehammers work the shoulders very well, especially if you swing them in circular forms, similar to how Indian Clubs and Maces are used.  Just a simple sledge can be really useful toward loosening up the shoulders prior to a big pressing workout, or to help you get into better position under the bar for squats.
4.  Core Strength
Because of the awkward nature of the sledgehammer, your core has to work quite a bit harder and definitely in a different way when swinging one. 
And don't just think of the core as the abdominal muscles alone, think of the lats and the glutes as well.  All of these body parts are firing when you swing a sledge, especially if you can swing laterally against an object like a standing tire - talk about crazy rotation and deceleration training.  This is great for bat and stick sports and even combat athletes.
5.  Contra-Specific Training
Contra-Specific Training is a concept that is out there but you don't hear much about yet, but I think you will in the future.  The main idea behind it is strengthening opposing movement patterns. 
A prime example would be coupling Pull-ups with Military Press because they work complimentary pulling and pushing movements. 
Sledgehammers can accomplish the same thing, especially for those who do so much Kettlebell work, which involves Extension of the body.   Sledges, when used to strike down onto something, work powerful Flexion - both styles of training compliment one another very well and I think with time you will see more and more of this mentioned.
Sledge work is great for everybody.  It can be done as a way to isolate movement patterns like various wrist and forearm actions, or it can be done in more of a full-body, multi-joint manner of training.
So make sure you get one for yourself (you can grab one here) and don't forget to check out the new post on Slim the Hammer Man.
All the best in your training.
Jedd

Thursday, June 07, 2012

Creating Tension to Increase Strength

DIESELS,
 
Today, I am sharing with you one of the biggest
keys to improving strength performance, and I
learned this when I first started tearing cards.
 
Incidentally, the Card Tearing Week special is
still going on and you can pick up the Card
Tearing eBook for just $19.99 right here.
 
When I first started tearing cards, there was
a lot of grunting, sweating, and fury, but there 
wasn't much tearing going on with the deck of 
cards.
 
Instead, the cards would slide all over the place
and I couldn't do what I wanted with them. 
 
Maybe you have seen this when you have torn
a deck of cards?
 
Eventually the decks would tear, but they were
turned into a mess because I had no control
over what I was doing.
 
This was very early in my strength journey, and
I was learning as I was going, and around that time
I read an article by Pavel Tsatsouline about Tension.
 
He wrote about creating Tension in the larger
muscles of the body in order to stabilize joints
and transfer this strength into the extremities. 
He was talking about the Bench Press in the
article, but I thought, "this has got to work
for card tearing."
 
So, I began experimenting with Tension, and
I found that if I squeezed the deck of cards really
hard, the muscles all the way up my arms and
into my torso would eventually all turn on as well.
 
Give it a try - you will see for yourself what I mean.
 
If you don't feel it, then practice it, because Tension
is a skill.
 
So then I thought, well what if I tense up the upper
back and torso first?
 
What I found was the Tension would radiate down
the arms into the hands (just like Pavel had described
in the Bench article) and it felt like I had a much
better grip on the cards.
 
Once I got a hang of this Radiant Tension, card
tearing became a lot easier for me, and I even began
experimenting with other techniques of card tearing
(there's lots of different ways to tear cards, like I
cover in my Card Tearing Ebook)
 
What's awesome is, if you are passionate about Card
Tearing or another Feat of Strength, once you get
good at applying Radiant Tension with your favorite
feat, you can apply it to the other feats
 
And you can also apply it to other more conventional
lifts.  So even if you are not big into something like
Squats, you can learn to apply this concept to your
Squatting.
 
After a while, you will even notice that once you
strengthen your skill of Tension Production, you won't
even think about creating tension - you'll just do it
when you need to.
 
So, in a way, Tearing Decks of Cards can help you
improve your squat.
 
All the best in your training,
 
Jedd
 
P.S.  If the emails become sporadic in the next few
days, I apologize ahead of time, but I will be
traveling to Ohio for Grip Sport Nationals and won't
have my regular computer access.  Wish me luck,
and I will have a full report next week.  And if you
want to pick up one of my most popular ebooks,

Saturday, May 19, 2012

Nothing is Going to Stop Me

I do coaching in many ways through the internet and it gives
me the opportunity to work with many different people
in varying degrees of one-on-one interaction.
Whether it's TheGripAuthority.com where I work with more
people but on a less-personal basis, or my One-on-One
program where I work with fewer people, but have more
personal contact, I am all about helping people attain their
goals.
However, one thing you have to know about training -
whether  it is for Grip Strength or some other aspect of the
Iron Game, you've got to have the right Mindset.
In other words, you can't go into your training doubting
yourself.
If your goal is to lift a certain weight, like the deadlift, or
pick up a certain Grip Strength challenge item, or do some
other awesome feat, you can't have any doubts that you
will get it.
You have to have the mindset that - -

                        "NOTHING is going to stop me."
Here's a little story...

I used to train with a guy all the time who would constantly,
right before he went for a lift, say something like, "Man I
don't know if I can lift this."
I would get on this dude's case all the time because that
kind of sh*t used to pi** me off big time!
You have to go after your goals like a savage, crazed,
BEAST.
If you fail at doing something the first time, who cares? 
Failing once doesn't mean you won't ever get it.
Ever watch those TV programs where the lions go after
the gazelles?  Those savage, crazed BEASTS will run
around the savannah chasing after prey for hours until
they tackle one.
If they quit their pursuit after one miss, they'd never eat,
the pack would die off, and the Lion race would go extinct.
That's how you've got to go after your training.  Like a
Lion in the grasslands chasing down their prey.
I'm not saying you need to grow your hair long and growl
out loud every time you lift (although I am enjoying doing
just that these days) but you do need to approach each set in
 the right way.
If you are letting little doubtful statements like, "Not sure if
I can do this" enter your mind, stop it right away and think
of something else to replace it.
One thing I like have been using lately is "This is MINE,"
before I go after a lift.  In the past, I have even used,
         
                "New Record in December, Baby!"
You might have something else, like "Light Weight" a la Ronnie
Coleman.  Or maybe there is a line from a movie you like.  
Find something you like and run that through your head 
every time you are about to hit a lift and you will see 
improvement.
Whatever works for you to develop that "NOTHING is going
to stop me from reaching my goals" type of mentality,
Heck, you can even wear shades in the gym and declare right
before you go for something HUGE, "I came here to kick ass
and chew bubble gum, and I am all out of bubble gum, like
Rowdy Roddy Piper in the movie, Them."

Whatever gets you in the right frame of mind - like the Lion
on the  prairie hunting down those tasty gazelles.
All the best in your training,
Jedd
P.S.  I first learned how truly powerful this Mental Training
can be when I was shooting Road to the Record.  I was training
for the  Two Hands Pinch world record and I kept saying, over
and over - "New Record in December Baby!"
Sure enough, it worked and I've never stopped doing it since.
If you want to see exactly what I mean, check out my DVD, 
Road to the Record, and see how I train like a savage, raging, BEAST.

Tuesday, January 24, 2012

New DVD: Braced Bending


Mike Rinderle and I have released our second project together, called, Braced Bending:  How to Detroy Everything in Your Path.

In this one, we cover techniques for bending not only various lengths of steel, but also wrenches, horseshoes, hammers, and even how to roll frying pans.

So check this thing out today.  Braced Bending DVD


I want to hear about the damage YOU can cause.

All the best in your training,

Jedd